
Difficulty : Basic / Advance
Topic : Flexible Magic Button
Download : [ Flexible Magic Button ]
Starting Up
A canvas that measures up 200 px X 200 px would be sufficient for this tutorial.

And we'll create a new Symbol which we'll name it btn_template.

Yes, we'll have nothing but only this movie clip inside our library. Amazing isn't it?
Inside the movie clip (using it to act as a button)

Moving on, we'll have a very simple looking movieclip which will act as a button. Three layers.
- Actions - nothing complicated here, only stop(); will be placed here.
- txtbox - A dynamic textbox will be placed here, which where the magic comes from.
- design - Only functions visually, and doesn't affect your button.

We'll prepare as planned, one simple rectangular and dynamic textbox.

See? Nothing's complicated. Unless if you decide to implement advance interaction here.
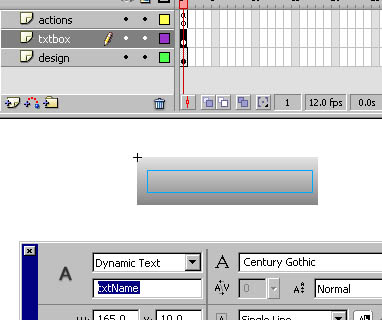
Next, we'll proceed with giving this dynamic textbox a name, for this case, we'll name it txtName

Some tweaking which is up to your preference to make the Dynamic text appear. For this case, it's more appropriate to center the text and unselect the "Selectable" option on the Properties panel.
We're done setting up the movieclip. We'll go back to the main scene.
The Finishing
Remember the golden rule in doing any project, REMEMBER TO SAVE! :)
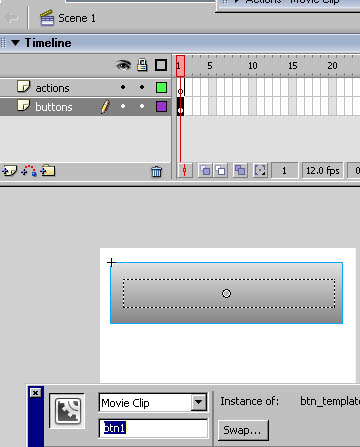
The Stage's empty now right? Drag one instance from the Library to the stage, and name it btn1

Be patience, we'll about to see some magic soon, and on the actions layer, write the script as shown on the screenshot. And we'll test the movie and see if it's working.

You can choose the option Test Movie or by using Ctrl+Enter (CMD+Enter for Mac user)

THE MAGIC! yes, the word appeared. And what's next, no, we're not done yet.
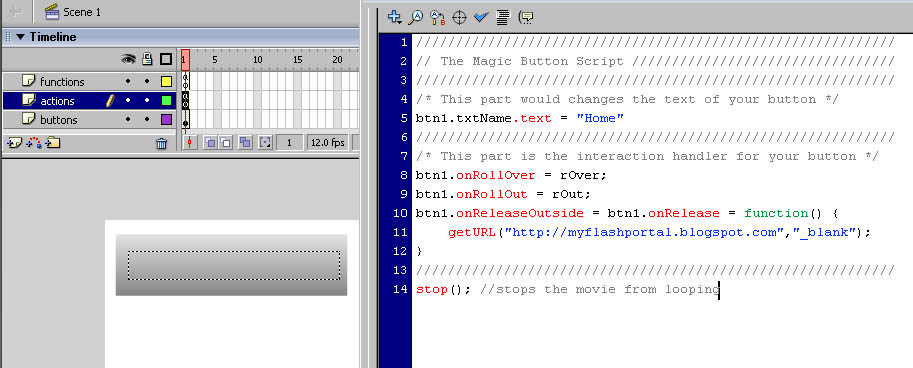
As usual, we'll use the super-power of function make everything here easy. If you notice correctly, you'll find the similarity with the Rollover Smooth Button scripts. Yes, the share the same format but in this tutorial, you can dynamically change the content inside the button, using dot syntax.
Using Functions to simplify everything

On the functions' layer, we'll have this. Because instead of repeating the same Rollover and Rollout code all over again and making everything looks crowded on the actions layer, we'll simplify and only call rOver() and rOut() only.
*Note *
You might ask if it would make a difference if you place the functions and actions layer different, let's say for this case, note the function layer are placed above actions layer? And on the actions layer i placed a stop() on the bottom of the actions layer? In this case, if I place the actions layer on top of function layer, you might notice that the magic won't work, not even the Rollover/Rollout effect, this is because you stopped the movie before Flash reads the function layer. So, it does takes some planning if you want to separate layer. But not a big problem though, just a reminder.
Possibilities

Yes, you might ask, can i reuse the button and name it differently? Yes you can! That is where the magic comes from. And if you're interested to expand the idea and how far this interaction could go, I'd say, your creativity is the limit, and you can learn more on how to integrate different thing, and I'd have the tutorial ready in case you want to refer, and YES, you can combine all of it!
- Rollover Smooth Button (Transitions when rollover a button)
- Adding Sound to your button (Creating the wow-effect)
Here's the FLA file, have fun Flashin'
Download : [ Flexible Magic Button ]
No comments:
Post a Comment